A. Adding items to objects and characters
The time has come to learn how to add items to objects and characters! This is an important thing to know how to do, since it lets us give the player optional objectives in battle (like breaking open chests or trying to grab dropped item sacks before the enemy does). This also allows us to reward the player periodically with cool new stuff while providing the player with an ongoing source of mundane items essential for his or her survival.
 So, how to do this? While we could do it in a text editor, the map editor will make things much easier! Reopen your battle in the map editor, then click the Edit Object button. Next, click on any destructible object on the battlefield; a new window should pop up like the one you see on the right.
The last field of the window is labeled “Inventory”, and it should say None. Replace None with the name of any item you want to put inside this object. (As before, you can find the names of all available items in ItemClasses.xml.) Whenever you’re finished, close the editing window and your changes will be saved to the map.
 You can add multiple items to the same object by simply typing them all out with a forward slash between each of them. Here, just for fun, I’ve decided to load up the bush right next to the player character spawn points with a ton of consumable items: Bandages, Focus Pills, Eye Drops, Adrenaline Pills, and Wine.
Now, what about adding items to characters on the battlefield? This works almost exactly the same way! 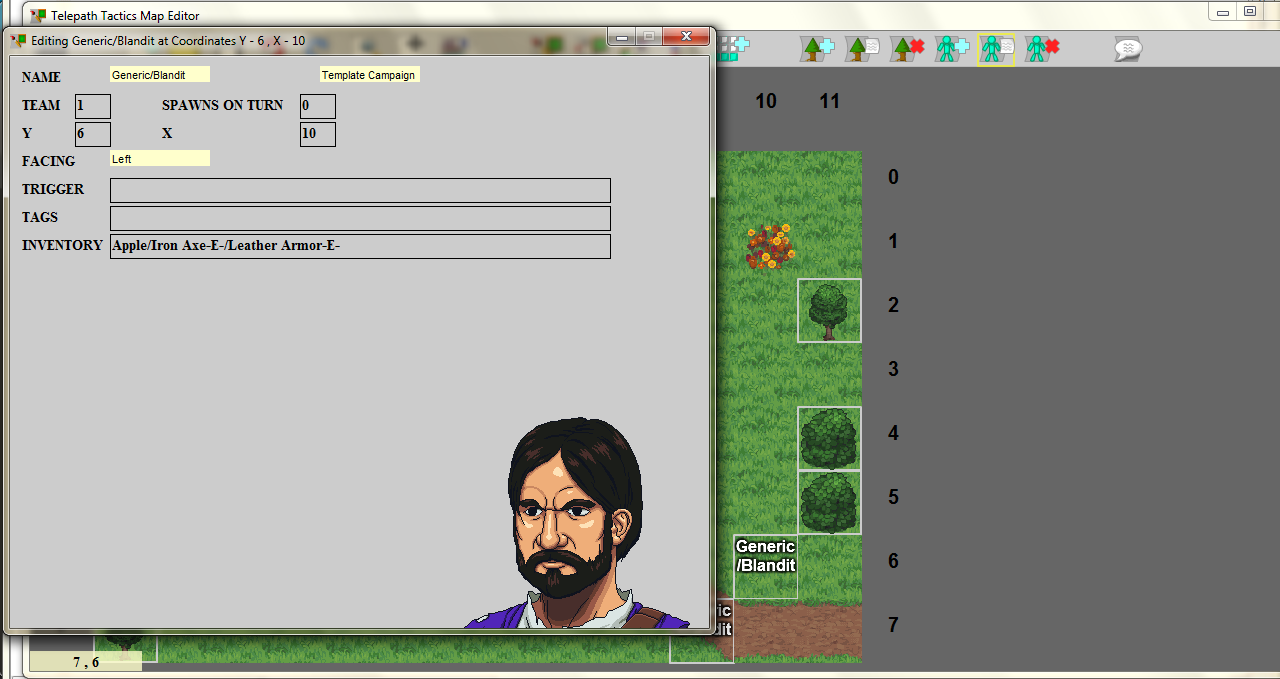 The only real difference is that you can use the -E- designator to have characters start the battle already equipped with the items you add. Here, for example, I’ve given a Generic Blandit an Apple and decked him out with an Iron Axe and Leather Armor. This will make him a lot tougher than he would be without those things, and give the player a special reward for taking him down. (Loot. The reward is loot.)
Close the editing window to have the map editor register your changes, then save your map. Keep the map editor open, though–we’re not done quite yet!
B. Character tags for enemies
Up to this point, when we’ve talked about “tags,” we’ve been talking about XML tags–the elements enclosed by these <> things in our XML files. Now we’re going to talk about character tags, which are basically just bits of data we can associate with particular characters to change the way the game treats them.
We’ll start simple and learn two basic character tags that you can stick on enemies to make them tougher and change their behavior–LevelUp and Passive:
LevelUp – this tells the game to silently make the tagged character gain one or more levels as soon as he or she spawns on the battlefield. This makes it quick and easy to create tougher versions of existing enemy types! When using this tag, follow it with a comma and the number of levels you want the character to gain.
Passive – an AI tag that makes it so the tagged character will not move during its turn unless it detects an enemy within its move-and-attack range. (Without this tag, an enemy will aggressively seek out the player from its first turn until it dies.)
Now, actually adding these tags to enemies is a cinch! Click Edit Character, then click an enemy. The same edit window we saw before will open up. We’re going to be editing the Tags field this time, though, not Inventory.
 To tag an enemy as passive, type Add,Passive in the Tags field. To tag an enemy for leveling up, type Add,LevelUp,1 (or any number higher than 1) in the Tags field. Just as with items, if you want to add multiple tags, just stick a forward slash between them–as you can see on the right.
You might notice that I added a third tag to the enemy in that example picture: ID. This is a particularly important tag because it allows us to run scripts on particular enemies even when those enemies don’t have a unique name to identify them by. You don’t need to worry about this just yet, but remember that it exists–we’ll return to it later, when we start getting into scripting.
In the next part of our tutorial, we’ll get an introduction to dialog–how to trigger it and how to structure it!