A. Intro to script actions
We now know how to write dialogue and structure conversation trees, but we haven’t yet touched on the deepest, most powerful thing available to us in conversations (and arguably, in the game itself): script actions!
Script actions are Telepath Tactics’s way of letting you program your own stuff in the game. “What do you mean, ‘stuff’? What can I program, Craig?!” Well, just about anything! From changing battlefield conditions on the fly to editing character stats, teaching characters attacks or spawning objects and enemies, killing characters or changing the level’s music, there are very few things you can’t accomplish through script actions. (Heck, I used script actions in the main campaign to handle scripted events during battles, implement character death logic, and handle character class promotions, among about a zillion other things.)
As of the time of writing, there are no fewer than 104 different script actions supported in the game; Modding Section D of the manual contains an exhaustive list of them all, with detailed explanations and examples of how to use them. For now, though, let’s go through some of the more common script actions and get familiar with how they work.
B. Using AddSpeakerPortrait and ClearPortraits
The game has a whole bunch of script actions relating to character portraits–and if your campaign has any appreciable amount of character dialog, then you’re going to be using these a lot. So we’ll use the simplest of these to get familiar with the basics of using script actions.
 Open up the map editor, load your battle, then click Edit Dialog to get into the dialogue editor. Click the first branch of your conversation to open the Edit Window.
In the middle-left of the Edit Window, you should see the word ACTIONS and a circular button with a plus sign–press that button to create a new script action.
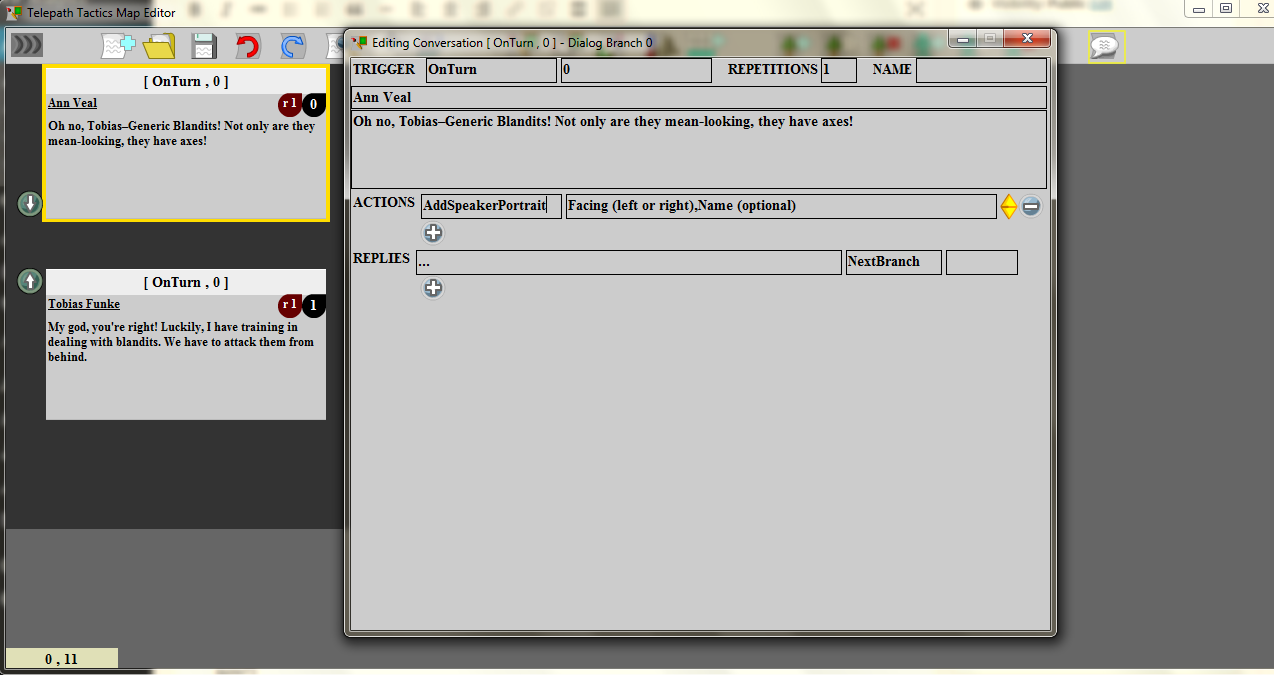 You should see two new text fields; one that says Action Name, and one that says Type Your Parameters Here! In the first text field, delete Action Name and type AddSpeakerPortrait–you should see the the second text field automatically fill up with text that explains the action’s parameters.
 Parameters are basically just extra information that you give the game so it knows exactly how to execute your script action. Some actions have no parameters; some have a lot of them. As you can see, AddSpeakerPortrait has one required parameter: the direction the portrait should face, either left or right. Delete the text in the parameters text field and type right, then close the edit window and save your map.
If we were to open up our map now, we’d see the portrait for the speaker appear during dialog branch 0, then remain onscreen for the remainder of the conversation. That’d be fine if we wrote a monologue, but most conversations involve multiple characters–we need to be able to get rid of that portrait and put another portrait up in its place when we go to the next branch.
 Luckily, this is super easy! We’ll use an action called ClearPortraits; this removes all portraits currently on the screen. It doesn’t even take any parameters; to use it, all we have to do is open up branch 1 in the Edit Window, create a new action, then type ClearPortraits in the Action Name text field. Next, create a second action, type AddSpeakerPortrait, then make it so the parameters text field says left.
That’s it! Just repeat this process for every other branch where the speaker changes–then, when you play the map, you should see each speaker’s portrait pop up to replace the prior one as the conversation progresses. Whenever you’re done, just make sure to save your map.
C. Other Portrait Actions
Lest you think those are the only two portrait actions, rest assured that there are many more! For instance, there’s another way to add portraits besides AddSpeakerPortrait; AddPortrait is a more complicated (but also more flexible) alternative:
AddPortrait – this lets you add a particular portrait to the screen even if it doesn’t match the default portrait for the character that’s currently speaking! AddPortrait has three required parameters: Portrait Name, Portrait Filename, and Facing. Portrait Name can be anything you want; this will be the word or phrase you’ll use to manipulate the portrait later. Portrait Filename, by contrast, must be the name of the image file, minus its .png file extension (it will be loaded from within Data > Characters > _Portraits). Facing must be either right or left, and determines the direction the character portrait will face.
In addition to those three required parameters, there are three additional, optional parameters you can use: Palette, Plus Y, and Plus X. Palette can be set to any army color (Red, Blue, Green, Yellow, Violet, Pink, Orange, White, or Black). Plus Y and Plus X each take an integer value that shifts the portrait’s starting position the designated number of pixels vertically and horizontally, respectively.
Once you have portraits on the screen, you can manipulate them individually using MovePortrait, FlipPortrait, LightPortrait, and FadePortrait. You can also remove them individually with RemovePortrait if you want to clear some–but not all–of them. Consult the manual for more details on the parameters for these actions!
D. Character rotation actions
 Portrait actions are not the only actions you’ll want to know for basic conversations between characters. During conversations, you’ll oftentimes want the speaker to face a second character that they’re talking to. There’s a script action for this: RotateCharToFace.
RotateCharToFace takes two parameters: the name of the character to rotate, and the name of the character they should face toward. Since I have Ann Veal talking to Tobias Funke in branch 0 of my conversation, my parameters will be Ann Veal,Tobias Funke (as shown on the right).
If you want a character to look at a particular spot on the battlefield instead of facing another character, use the RotateCharTowardPoint action instead. This one takes three parameters: the name of the character to rotate, the Y Coordinate of the space you want them to face toward, and the X Coordinate of the space you want them to face toward.
Finally, if you just want a character to face in one particular direction no matter what, you can use RotateChar. There are two parameters for this one: the name of the character to rotate and the direction to face (Up, Down, Left or Right).
That about does it for our introduction to script actions. There are dozens and dozens more actions we could talk about, but I don’t want to overwhelm you! In the next part of our tutorial, we’ll talk about using script actions to change battlefield conditions.